[This article is rich in hyperlinks. I chose these to do a better job of explaining things than I can normally do. Please visit them.]
In the last blog posting, I talked about how to
setup Theano on Fedora 25. Setting this up is pointless if you don't have a goal. There is a really cool application of Deep Learning that has on been published for about a year or two. Its called
super resolution. Do you remember that scene in Blade Runner where Harrison Ford's character is analyzing a photo he found and
zooms into the mirror to see around the corner? Well, we pretty much have that today. To get properly oriented on this topic, please watch this video:
https://www.youtube.com/watch?v=WovbLx8C0yA
OK. Are you interested in seeing something cool?
Neural Enhance
There is a project on github,
neural-enhance, that houses some code that does super resolution. Log in to your AI account that was setup for theano. Then, grab yourself a copy of the code:
$ git clone https://github.com/alexjc/neural-enhance.git
Now, we need to install the dependencies for neural-enhance. It needs a couple things from Continuum Analytics. But neural enhance also calls out for a very specific check-in hash of the
Lasagne framework. It appears to be a bug fix. (Just in case you are not familiar,
Lasagne is a high level framework, similar to
Keras, that you tell it what you want to make and how the layers are connected, and it makes it.) It would appear that Lasagne developers have not made a release in a long time hence the special version.
$ conda install pip pillow colorama
$ python3.6 -m pip install -q -r "git+https://github.com/Lasagne/Lasagne.git@61b1ad1#egg=Lasagne==0.2-dev"
OK. Neural Enhance has some pre-trained models that you can download to experiment with. Time to get some models.
$ cd neural-enhance
$ wget https://github.com/alexjc/neural-enhance/releases/download/v0.3/ne2x-photo-default-0.3.pkl.bz2
$ wget https://github.com/alexjc/neural-enhance/releases/download/v0.3/ne4x-photo-default-0.3.pkl.bz2
$ wget https://github.com/alexjc/neural-enhance/releases/download/v0.3/ne1x-photo-deblur-0.3.pkl.bz2
$ wget https://github.com/alexjc/neural-enhance/releases/download/v0.3/ne1x-photo-repair-0.3.pkl.bz2
We have everything...so let's try it out.
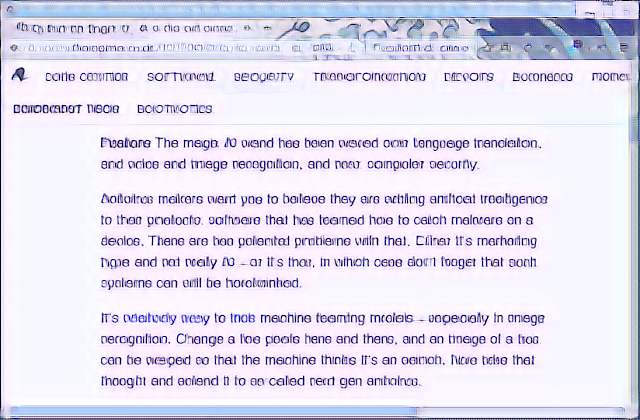
Andrew Ng says that AI today is good at mapping A to B. (Specifically, see what he says at 4 minutes into the clip. This is such an amazing talk, it worth watching in its entirety.) Given data of type A, map it to B. I would like to test this using neural enhance. The program claims to have 3 capabilities: zooming for super resolution, deblurring, and denoising pictures. I would like to test the deblurring capability because that is the least subjective output. Given a blurry image, can it create output I can read?
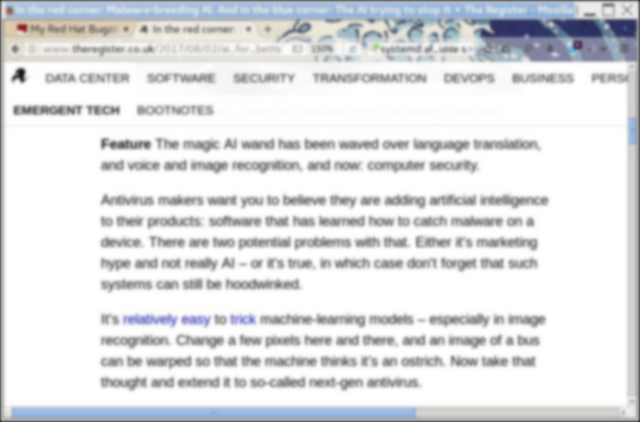
To do this experiment, what I did, is get a screenshot of a malware article on "
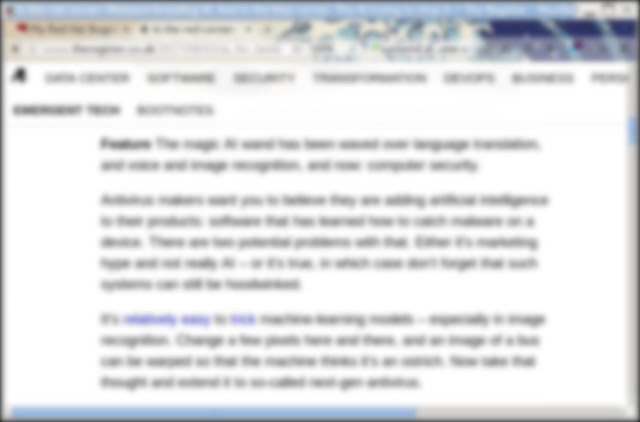
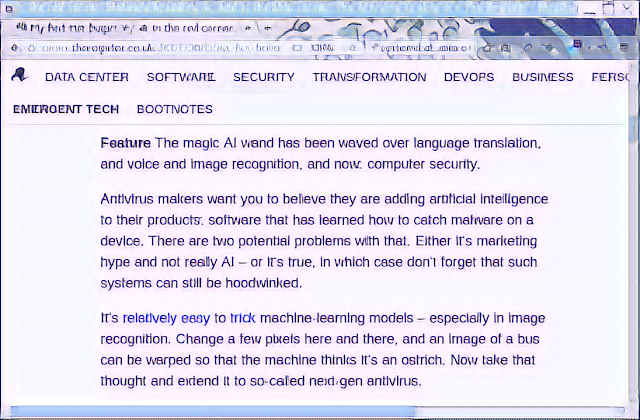
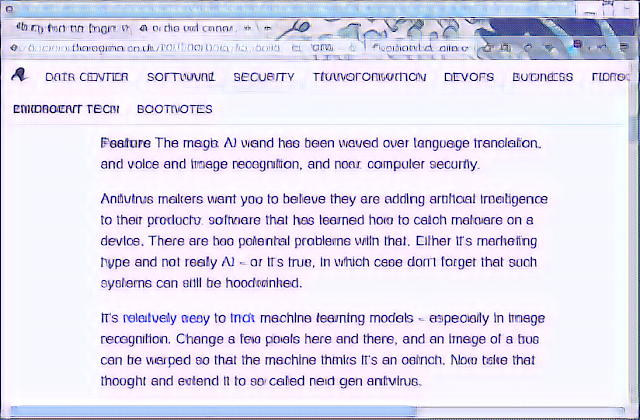
The Register". I loaded that into gimp and then made 3 pictures applying an 8, 12, and 16 pixel Gaussian blur. They look like this:
 |
| 8x blur |
 |
| 12x |
 |
| 16x |
As you can see, the 8x is not to hard to read. If you never saw the article, you could probably make out what its about. The 12x is nearly impossible. And the 16x is impossible. Can we decipher this with AI? Let's see...
To use the default model that comes with neural enhance, we would run it as follows. Note that when using the ai account, its not the account that I logged into my desktop with. So, I pass pictures between the accounts through the /tmp directory.
$ python3.6 enhance.py --type=photo --model=deblur --zoom=1 /tmp/screenshot-blurx8.png
On my system, this takes about 20 to 25 seconds to complete. I get the following picture:
Hmm...color me not impressed. Its better, but its not the jaw dropping wow that I was looking for. How about if we run the enhanced picture back through and enhance it a second time?
I'm still not impressed. And if its that fuzzy on 8x, then it has no hope of doing the 12x or 16x. At this point you may be wondering why I'm wasting your time and had you to go through all the trouble of setting up theano with the promise of something cool. I wondered, too. Then I realized that if you want something done right, you gotta do it yourself.
Training your own model
The default models that come with neural enhance are general models trained with all kinds of pictures. If we are trying to deblur text, would a model trained on dogs, cats, birds, trees, cars, and whatever really give the best results? Having 20 - 20 hind sight, I can say no.
So, in the neural-enhance project directory, there is a subdirectory called train. We will go into it and download a general network model and start training our own. In the train directory, I created subdirectories called text-samples and model-backup. The training process is two steps and I wanted to make a backup between runs - just in case. Regarding the text-samples, I made screenshots of 25 articles from 5 different web sites. I chose articles with no pictures to make the model tuned specifically for text. Another rule is that you should not put the text image that we are using judge the model with into the training samples. That would be cheating. OK, let's start...
$ cd train
$ mkdir model-backup
$ mkdir text-samples
$ cp /tmp/text-samples/* text-samples/
$ wget https://github.com/alexjc/neural-doodle/releases/download/v0.0/vgg19_conv.pkl.bz2
$ ln -s ../enhance.py enhance.py
$
$ python3.6 enhance.py \
--train "text-samples/*.png" --type photo --model unblur \
--epochs=50 --batch-shape=240 --batch-size=12 --buffer-size=1200 \
--device=gpu0 \
--generator-downscale=2 --generator-upscale=2 \
--generator-blocks=8 --generator-filters=128 --generator-residual=0 \
--perceptual-layer=conv2_2 --smoothness-weight=1e7 \
--adversary-weight=0.0 \
--train-noise=10.0 --train-blur=4
I have a beefy GTX 1080 Ti. It took a little over 4 hours to run the pre-training. At first I was getting "unable to allocate memory" errors. After some research I found that the batch-size and buffer-size controlled how much memory was used. If you hit this even with these settings, lower the batch-size to 8 or 6 or 4 and see if that fixes it. The 1080 Ti has 11 Gb of memory, so if you only have 4Gb, then you need to drastically reduce it. You can use a utility from nvidia to see how much video memory is being used.
$ nvidia-smi -l 1
Hit control-C to exit it. OK...4 hours have passed and its done. What we just did was the pre-training. The pre-training helps the real training be more successful in picking out what it needs to. In this round, the generative model is being trained. The next round adds the adversarial model to the training. I'll talk more about that after we kick off the real training.
$ cp ne1x-photo-unblur-0.3.pkl.bz2 model-backup/
$ python3.6 enhance.py \
--train "text-samples/*.png" --type photo --model unblur \
--epochs=250 --batch-shape=240 --batch-size=12 --buffer-size=1200 \
--device=gpu0 \
--generator-downscale=2 --generator-upscale=2 \
--generator-start=10 \
--perceptual-layer=conv5_2 --smoothness-weight=5e3 \
--adversarial-start=10 --adversary-weight=5e1 \
--discriminator-start=0 --discriminator-size=48 \
--train-noise=10.0 --train-blur=4
OK, while that is running let's talk about the strategy. The program uses a
generative adversarial network. This is basically two models, a generator and a discriminator, that play a game. The generator learns from the training data how to generate something that is similar to the training data. The discriminator judges the quality of the work. So, its like an artist creating fake paintings that are close enough to fool the art critic. During training each side gets better and better at the role it has to play. The generator gets better at creating fakes based on feedback from the discriminator, and the discriminator gets better at spotting fakes. The two have to balance to be useful.
Most training runs can take 500 to 1000 epochs or more to complete. I don't have that much time. So, I settled for 250 as a way to balance how much time I want to devote to this experiment vs having a model good enough to see if the technique is working. During the training, my 1080 Ti took about 130 seconds per epoch. That works out to be about 9 hours of runtime.
OK. 9 hours has passed. So, how does the new model work? Judge for yourself...this is the converted images:
 |
| 8x |
 |
| 12x |
 |
| 16x |
For the first one, the text is pretty crisp. Much better than the default model. The second one you can see some noise starting to show up - but the text is easily readable. The real test is the final 16x image. It does have some noise in it. Perhaps more than 250 epochs of training would reduce that some more. Perhaps more text samples would help, too. But I have to say that it did an unbelievably good job of taking text that was so blurry that you could not read it and turn it into something so close that you can understand the article and guess what the mistakes were supposed to be.
The moral of this story is...do not depend on Gaussian blur as a way to obscure objects or text in a photo. All it takes is someone to come along with the right model and they can unmask the object.
Conclusion
In this article we've put Theano to use, learned how to train a model for super resolution, and saw that a general model is OK. But to get amazing results requires creating a tuned model for the exact job at hand. Neural enhance is also capable of zooming into pictures and augmenting the missing detail based on its models. The reader may want to experiment with this feature and create models useful for zooming or denoising. Have fun...


